Yesterday I attended the Softwerkskammer Karlsruhe meetup for the first time. Softwerkskammer tries to connect the Software craftmanship community in Germany.
The topic for the evening was simple: More Code. We looked at a lot of samples from a real project and discussed what's wrong with them and what could be done better. There were a lot of different opinions but that's a good thing as I got to question some habits I have when programming.
This has been the first time I've been to a meeting where there is a lively discussion like this. The conferences and user groups I attend mostly have classic talks with one speaker and far less audience participation. Talking about code is a really good way to learn and this won't be the last time I attended a meetup. Thanks to the organizers.
Donnerstag, 29. Dezember 2011
Montag, 26. Dezember 2011
Spring in Action
Sometimes it's comfortable to not be an absolute expert in a certain technology. This makes it really easy to learn new stuff, e.g. by profane methods like reading a book. Even if you are a Spring expert it is still likely that you will take something from the latest edition of Spring in Action by Craig Walls as it covers a wide range of topics. I haven't read one of the predecessors but people told me that those are even better.
Having finished the book recently I just wanted to take the time to write down two interesting small configuration features that I learned from it.
p-Namespace
A feature that I just didn't know before but seems to be quite useful is the p-Namespace. It's a namespace that is not backed by a schema and allows to configure beans in a really concise way. For example look at how a bean might be configured normally:
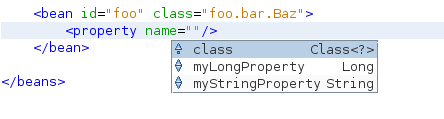
    <bean id="foo" class="foo.bar.Baz">
        <property name="myLongProperty" value="2"/>
        <property name="myStringProperty" value="Hallo"/>
    </bean>
The properties we'd like to set are children of the bean node. Netbeans comes with nice autocompletion support for the property names as you can see from the screenshot.
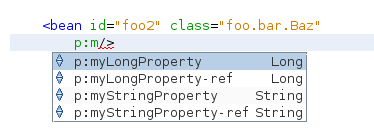
The p-Namespace is a more concise version where the property names itself become attributes of the bean node:
    <bean id="foo" class="foo.bar.Baz"
        p:myLongProperty="2" p:myStringProperty="Hallo"/>
See that Netbeans is also clever enough to offer code completion here as well.
I am not sure if I will use the short form of the p-Namespace a lot. A consistent use of the features in a project is quite important so I think if the short form is used it should be used everywhere in the project.
Accessing Constants
Sometimes you need to access some constants in your Spring configuration files. There are several ways to handle this, one of it using the util-Namespace:
<property name="day">
    <util:constant static-field="java.util.Calendar.WEDNESDAY"/>
</property>
Another way can be to use the Spring Expression Language to access it:
<property name="day" value="#{T(java.util.Calendar).WEDNESDAY}"/>I think this can be used more commonly as the value doesn't need to be registered as a subnode. For example I had some problems using util:constant as key or value in a util:map. That would have been easy just using the EL version.
Mittwoch, 7. Dezember 2011
Not another Diamond Operator Introduction
I just returned from the talk "Lucky Seven" of our local Java User Group. It was far better than I expected. Not that I expected Wolfgang Weigend to be a bad speaker but though I organized the event I got the feeling that I had seen one too many Java 7 introductions already. But there was more ...
One of the interesting aspects that I haven't been paying that much attention to is the merge of the JRockit and Hotspot VM. Hotspot will be the base of the new development and JRockit features will be merged in. Some of these features will already be available in OpenJDK during the JDK 7 timespan.
One of the changes got some amount of interest lately: The PermGen space will be removed. Sounds like a major change but, once it works, it will definitively be a huge benefit.
JRockit has been highly respected for its monitoring features. Among those is the interesting Java Flight Recorder that reminds me of the commercial project Chronon. It will be an always on recording of data in the JVM that can be used for diagnostic purposes. Sounds really interesting!
The overall goal of the convergence is to have a VM that can tune itself. Looking forward to it!
The (mixed german and english) slides of the talk are available for download.
Mittwoch, 26. Oktober 2011
Getting started with Gradle
Maven has been my build tool of choice for some years now. Coming from Ant the declarative approach, useful conventions as well as the dependency management offered a huge benefit. But as with most technologies the more you are using it the more minor and major flaws appear. A big problem is that with Maven builds are sometimes not reproducable. The outcome of the build is influenced by the state of your local repository.
Gradle is a Groovy based build system that is often recommended as a more advanced system. The features that make it appealing to me are probably the easier syntax and the advanced dependency cache.
For a recent project that I just uploaded for someone else I needed to add a simple way to build the jar. Time to do it with Gradle and see what it feels like.
The purpose of the build is simple: compile some classes with some dependencies and package those to a jar file. Same as Maven and Ant, Gradle also needs at least one file that describes the build. This is what build.gradle looks like:
Let's step through the file line by line. The first line tells gradle to use the java plugin. This plugin ships with tasks for compiling and packaging java classes.
In the next block we are declaring some dependency repositories. Luckily Gradle supports Maven repositories so existing repositories like Maven central can be used. I guess without this feature Gradle would not gain a lot of adoption at all. There are two repos declared: Maven central where most of the common dependencies are stored and a custom repo that provides the OpenCms dependencies.
The next block is used to declare which dependencies are necessary for the build. Gradle also supports scopes (in Gradle: configurations) so for example you can declare that some jars are only needed during test run. The dependency declaration is in this case similar to the Maven coordinates but Gradle also supports more advanced features like version ranges.
The last block isn't really necessary. It's only there because my Java sources are located in src instead of the default src/main/java. Gradle uses a lot of the Maven conventions so it's really easy to migrate builds.
To build the project you need Gradle installed. You can download a single distribution that already packages Grooovy and all the needed files. You only need to add the bin folder to your path.
Packaging the jar is easy: You just run the jar task in the java plugin: gradle :jar. Gradle will start to download all direct and transitive dependencies. The fun part: It uses a nice command line library that can display text in bold, rewrite lines and the like. Fun to watch it.
I like the simplicity and readability of the build script. You don't need to declare anything if you don't really need it. No coordinates, no schema declaration, nothing. I hope I will find time to use it in a larger project so I can see what it really feels like in the daily project work.
Gradle is a Groovy based build system that is often recommended as a more advanced system. The features that make it appealing to me are probably the easier syntax and the advanced dependency cache.
For a recent project that I just uploaded for someone else I needed to add a simple way to build the jar. Time to do it with Gradle and see what it feels like.
The build script
The purpose of the build is simple: compile some classes with some dependencies and package those to a jar file. Same as Maven and Ant, Gradle also needs at least one file that describes the build. This is what build.gradle looks like:
apply plugin: 'java'

repositories {
    mavenCentral()
    mavenRepo url: "http://bp-cms-commons.sourceforge.net/m2repo"
}

dependencies {
    compile group: 'org.opencms', name: 'opencms-core', version: '7.5.4'
    compile group: 'javax.servlet', name: 'servlet-api', version: '2.5'
}

sourceSets {
    main {
        java {
            srcDir 'src'
        }
    }
}
Let's step through the file line by line. The first line tells gradle to use the java plugin. This plugin ships with tasks for compiling and packaging java classes.
In the next block we are declaring some dependency repositories. Luckily Gradle supports Maven repositories so existing repositories like Maven central can be used. I guess without this feature Gradle would not gain a lot of adoption at all. There are two repos declared: Maven central where most of the common dependencies are stored and a custom repo that provides the OpenCms dependencies.
The next block is used to declare which dependencies are necessary for the build. Gradle also supports scopes (in Gradle: configurations) so for example you can declare that some jars are only needed during test run. The dependency declaration is in this case similar to the Maven coordinates but Gradle also supports more advanced features like version ranges.
The last block isn't really necessary. It's only there because my Java sources are located in src instead of the default src/main/java. Gradle uses a lot of the Maven conventions so it's really easy to migrate builds.
Building
To build the project you need Gradle installed. You can download a single distribution that already packages Grooovy and all the needed files. You only need to add the bin folder to your path.
Packaging the jar is easy: You just run the jar task in the java plugin: gradle :jar. Gradle will start to download all direct and transitive dependencies. The fun part: It uses a nice command line library that can display text in bold, rewrite lines and the like. Fun to watch it.
I like the simplicity and readability of the build script. You don't need to declare anything if you don't really need it. No coordinates, no schema declaration, nothing. I hope I will find time to use it in a larger project so I can see what it really feels like in the daily project work.
Montag, 28. Februar 2011
Book Review: Solr 1.4 Enterprise Search Server
I've been interested in Solr since I read about it the first time, must have been some time in 2008, doing some research for a search centric web page that was supposed to be run on OpenCms but unfortunately was never developed. At that time I wouldn't have used it as I hadn't heard about it before but I liked the idea a lot. After having attended the Devoxx university session by Eric Hatcher on Solr in 2009 I was completely sure that the next search system I would implement would be based on Solr. The project's nearly finished now, time to recap what I took out of the book I got for learning Solr.
First of all, when learning a new technology I prefer paper books over internet research. Though there are other books available, Solr 1.4 Enterprise Search Server by David Smiley and Eric Pugh seems to be the one that is most often recommended.
The book starts off with a high level introduction into what Solr and Lucene are, some first examples and interestingly, how to build Solr from source. Though the book was released before Solr 1.4 the authors seemed to have the foresight that some features might still be lacking and had to be included manually. In fact, I've never seen an open source project where applying patches is such a common thing as it seems to be the case for Solr.
Schema configuration and text analysis are the topics for the second chapter. It begins with an introduction into MusicBrainz, a freely available data set of music data is used as an example throughout the book. This chapter is crucial to the understanding of Solr as it introduces a lot of Lucene concepts that probably not every reader is familiar with.
After quite some theory chapter 3 starts with the practical parts, covering the indexing process. Curl, the command line http client, is used to send data to solr and retrieve it. Another option, the data import handler, that directly imports data from a database, is also introduced.
Chapter 4 to 6 walk the reader through the search process and several useful components to enhance the users search experience like faceting and the dismax request handler. This is the part where Solr really shines as you can see how easy it is to integrate new features in your application that probably would have taken a long time to develop using plain Lucene.
Deploying Solr is covered in Chapter 7 with quite some useful information on configuring and monitoring a Solr instance. Chapter 8 looks at some client APIs from different programmin languages, SolrJ being the most important to me. The book ends with an in-depth look at how Solr can be tunded and scaled.
I can say that this is a really excellent book, as an introduction to Solr as well as a reference while developing your application. The most common use cases are covered, the examples make it really easy to adopt the concepts in your application. There are lots of hands on information that prove useful during development and deployment of your application.
Some slight drawbacks I don't want to keep to myself: As the common message format for Solr is a custom XML dialect, there is a lot of XML in the book to digest. As it's so common to use it that's not necessarily a bad thing but you might get quite dizzy looking at a lot of angle brackets. From a readers perspective some variety would have been nice e.g. by mixing XML with the Ruby format or JSON or introducing client APIs earlier. Also, while it's a good idea to use a data set that is freely available, MusicBrainz probably isn't the best format for demoing some features. There are no large text sections or documents, which are often what a search application will be build on. And finally, not really an issue of the authors but rather of the publisher, PacktPub: When skimming through the book it's quite hard to see when a new section begins. The headlines do not contain a numbering scheme and are of a very similar size.
Nevertheless, if you have to develop an application using Solr, you should by all means buy this book, you won't regret it.
Sonntag, 23. Januar 2011
Running Ruby on Rails Tests in Netbeans
I don't get it. Netbeans is often recommended as an excellent IDE for Ruby on Rails development, not only when targeting the JVM. Nevertheless, even some basic features don't seem to be working with the default setup. You can't even run the tests, which is fundamental to developing using a dynamic language.
What's happening? Suppose you have a simple app and you want to run some tests using the test database. Not sure if this is mandatory when using the built in JRuby but it seems to be normal to use the jdbcmysql adapter. When you try to run the tests you will see something like this:
followed by the stack trace that isn't really helpful as it's not the root cause. Rails somehow doesn't create the tables in the test database. You'll see a more helpful output when starting the rake task "db:test:prepare" directly in debug mode:
The task fails in the database task in the rails lib. You can open up the source code by opening the node
At line 357 you can see the problem: Rails only expexts some hardcoded adapters, jdbcmysql not being one of them. It skips the task for unknown adapters. Two options to fix it: Insert a regular expression that matches both:
or add the jdbcmysql adapter as a second option:
Now the tests are running and hopefully passing. The same kind of error might occur for other tasks as well as there are some more checks for the mysql adapter in this file. You should be able to fix them the same way.
I wouldn't have expected to have to patch the rails code for using it in Netbeans but this doesn't seem to be uncommon. Using a recent active record version is supposed to fix the problem as you can use mysql as an adapter name then but I didn't find a way to run the jdbc generator from Netbeans. It isn't available in the list of generators and I didn't find a generator gem to download.
What's to be learned for me from this? I got a better understanding of how the build process works using rake. But more importantly: even technologies that have been hyped for a long time might not be that flawless as you would expect.
What's happening? Suppose you have a simple app and you want to run some tests using the test database. Not sure if this is mandatory when using the built in JRuby but it seems to be normal to use the jdbcmysql adapter. When you try to run the tests you will see something like this:
1) Error:
test_index_is_ok(ContactsControllerTest):
ActiveRecord::StatementInvalid: ActiveRecord::JDBCError: Table 'kontakt_test.contacts' doesn't exist: DELETE FROM `contacts`
followed by the stack trace that isn't really helpful as it's not the root cause. Rails somehow doesn't create the tables in the test database. You'll see a more helpful output when starting the rake task "db:test:prepare" directly in debug mode:
** Invoke db:test:prepare (first_time)
** Invoke db:abort_if_pending_migrations (first_time)
** Invoke environment (first_time)
** Execute environment
** Execute db:abort_if_pending_migrations
rake aborted!
Task not supported by 'jdbcmysql'
/path/to/netbeans-6.9.1/ruby/jruby-1.5.1/lib/ruby/gems/1.8/gems/rails-2.3.8/lib/tasks/databases.rake:380
/path/to/netbeans/ruby/jruby-1.5.1/lib/ruby/gems/1.8/gems/rake-0.8.7/lib/rake.rb:636:in `call'
/path/to/netbeans/ruby/jruby-1.5.1/lib/ruby/gems/1.8/gems/rake-0.8.7/lib/rake.rb:636:in `execute'
/path/to/netbeans/ruby/jruby-1.5.1/lib/ruby/gems/1.8/gems/rake-0.8.7/lib/rake.rb:631:in `each'
[...]
** Execute db:test:prepare
** Invoke db:test:load (first_time)
** Invoke db:test:purge (first_time)
** Invoke environment
** Execute db:test:purge
The task fails in the database task in the rails lib. You can open up the source code by opening the node
Libraries/Built-in-JRuby/rails-2.3.8/lib/tasks/databases.rake in Netbeans.At line 357 you can see the problem: Rails only expexts some hardcoded adapters, jdbcmysql not being one of them. It skips the task for unknown adapters. Two options to fix it: Insert a regular expression that matches both:
when /mysql/ # instead of when "mysql"
or add the jdbcmysql adapter as a second option:
when "mysql","jdbcmysql"
Now the tests are running and hopefully passing. The same kind of error might occur for other tasks as well as there are some more checks for the mysql adapter in this file. You should be able to fix them the same way.
I wouldn't have expected to have to patch the rails code for using it in Netbeans but this doesn't seem to be uncommon. Using a recent active record version is supposed to fix the problem as you can use mysql as an adapter name then but I didn't find a way to run the jdbc generator from Netbeans. It isn't available in the list of generators and I didn't find a generator gem to download.
What's to be learned for me from this? I got a better understanding of how the build process works using rake. But more importantly: even technologies that have been hyped for a long time might not be that flawless as you would expect.
Sonntag, 9. Januar 2011
Refactoring in Git
To me, when using SVN, the most important reason for using an IDE plugin was the refactoring support: SVN doesn't notice when you rename a file, you have to explicitly call svn mv.
I thought this would be a major problem with Git, as a Java refactoring changes the content and the filename in one go. As the content changes the SHA1-checksum also changes and you'd run into problems. Fortunately, that's not the case.
With Git, you don't need a special operation: It detects renames with minor changes automatically.
Time for a test. Suppose you have a simple Java class like this:
public class TestClass {

    public static void main(String [] args) {
        System.out.println("Hello Git");
    }

}
Commit it to the Git repository:
flo@hank:~/git-netbeans$ git add src/TestClass.java
flo@hank:~/git-netbeans$ git commit -m "added test class"
[master 9269c2f] added test class
 1 files changed, 7 insertions(+), 0 deletions(-)
 create mode 100644 src/TestClass.java
Rename the class (either by using an IDE or by executing a manual refactoring by changing the file name and the class name):
public class TestClassWithNewName {

    public static void main(String [] args) {
        System.out.println("Hello Git");
    }

}
git status will tell you something like this:
flo@hank:~/git-netbeans$ git status
# On branch master
# Changed but not updated:
#   (use "git add/rm ..." to update what will be committed)
#   (use "git checkout -- ..." to discard changes in working directory)
#
#       deleted:    src/TestClass.java
#
# Untracked files:
#   (use "git add ..." to include in what will be committed)
#
#       src/TestClassWithNewName.java
no changes added to commit (use "git add" and/or "git commit -a")
Doesn't look that good yet. It detects an added and a removed file. Next, stage the changes and have another look at the status:
flo@hank:~/git-netbeans$ git rm src/TestClass.java
rm 'src/TestClass.java'
flo@hank:~/git-netbeans$ git add src/TestClassWithNewName.java
flo@hank:~/git-netbeans$ git status
# On branch master
# Changes to be committed:
#   (use "git reset HEAD ..." to unstage)
#
#       renamed:    src/TestClass.java -> src/TestClassWithNewName.java
#
Neat, Git detected a rename. Let's commit and see the log:
flo@hank:~/git-netbeans$ git commit -m "refactored class"
[master 4acd7f1] refactored class
 1 files changed, 1 insertions(+), 1 deletions(-)
 rename src/{TestClass.java => TestClassWithNewName.java} (72%)
flo@hank:~/git-netbeans$ git log src/TestClassWithNewName.java
commit 4acd7f19ccd6cc02816ee7f1293ea5a69d7a4ca7
Author: Florian Hopf
Date:   Sun Jan 9 14:27:59 2011 +0100

    refactored class
Hmmm, only the last commit? Looks like we have to tell that we want to follow renames:
flo@hank:~/git-netbeans$ git log --follow src/TestClassWithNewName.java
commit 4acd7f19ccd6cc02816ee7f1293ea5a69d7a4ca7
Author: Florian Hopf
Date:   Sun Jan 9 14:27:59 2011 +0100

    refactored class

commit 9269c2fd194b2bd2b93a18ab88f21fb2180c5870
Author: Florian Hopf
Date:   Sun Jan 9 13:48:35 2011 +0100

    added test class
What do I take from this experiment? I guess I won't use the Netbeans Git plugin for now. I still have to get acquainted to the command line and its better to learn the basics first.
Git hook for Redmine messages
At work we are using Redmine with the repository references enabled. When adding special terms like refs #1234 or fixes #1234 to the commit message the commit is automatically assigned to ticket 1234 and shown with the ticket. Only commiting code that references a ticket is considered to be a best practice as all changes are documented with a ticket.
As I'm using the Git SVN bridge now I tend to commit more than using plain SVN. Often I just forget to add the refs marker which is quite annoying. Pro Git introduces a hook that can be used to check your commit message for a special format.
This is the shamelessly copied hook, adjusted to the Redmine keywords:
#!/usr/bin/env ruby
message_file = ARGV[0]
message = File.read(message_file)

$regex = /(refs #(\d+)|fixes #(\d+))/

if !$regex.match(message)
  puts "Your message is not formatted correctly (missing refs #XXX or fixes #XXX)"
  exit 1
end
How to use it? Copy the code to the file .git/hooks/commit-msg in your project and make it executable (chmod +x .git/hooks/commit-msg).
Try to commit without the markers:
flo@hank:~/git-redmine$ git commit -am "commit that doesn't reference a ticket"
Your message is not formatted correctly (missing refs #XXX or fixes #XXX)
And with a marker:
flo@hank:~/git-redmine$ git commit -am "commit that references a ticket, refs #1234"
[master 189b6b1] commit that references a ticket, refs #1234
 1 files changed, 2 insertions(+), 0 deletions(-)
If you want to skip the hook for some reason you can do so using the --no-verify option:
flo@hank:~/git-redmine$ git commit --no-verify -am "special commit that doesn't reference a ticket"
[master d1c0698] special commit that doesn't reference a ticket
1 files changed, 1 insertions(+), 0 deletions(-)Donnerstag, 6. Januar 2011
GoGear title management in Sqllite
While writing this post I noticed that I am just wrong with my assumptions on my GoGear device. Read on to learn why. I'll publish it anyway as the information should still be valid for older versions of GoGear.
I've been looking for a way to enable the bookmarks feature for audio books for my Philips GoGear SA1922. Unfortunately according to this image, which is only displayed on the german site, it's not supported for this version though with the latest firmware there's a special menu option for audio books.
While experimenting I learned a few things along the way that are quite interesting. GoGear uses Sqlite for managing all meta information of the audio files stored. I use golb to transfer music from my Linux machine which does all the magic of extracting ID3 tags and inserting all data in the database. Normally you would use
If you want to see or manipulate the data you can use the sqlite client: In the same folder call
To see the schema information you can issue the .schema command, which display information on all the tables and its indexes:
To see some of the song information you can query the songTable:
You can use standard sql to update the information:
At this point I was about to hit the publish button for the post. Luckily I tried if the update happened at all. Turned on my device: Still the old title. Rebootet the device, deleted and recreated all indexes, inspected the Golb sourcecode, found nothing. After a while it struck me: I don't need golb for my GoGear version. This device seems to extract all information from the id3 tags directly, very likely during startup. Classic fail!
I've been looking for a way to enable the bookmarks feature for audio books for my Philips GoGear SA1922. Unfortunately according to this image, which is only displayed on the german site, it's not supported for this version though with the latest firmware there's a special menu option for audio books.
While experimenting I learned a few things along the way that are quite interesting. GoGear uses Sqlite for managing all meta information of the audio files stored. I use golb to transfer music from my Linux machine which does all the magic of extracting ID3 tags and inserting all data in the database. Normally you would use
golb -f _system/media/audio/MyDb in the root folder of the mounted storage device to scan all files on the device and write it to the database _system/media/audio/MyDb.If you want to see or manipulate the data you can use the sqlite client: In the same folder call
sqlite _system/media/audio/MyDb. This will open a client console similar to mysql:
flo@hank:/media/PHILIPS$ sqlite _system/media/audio/MyDb
SQLite version 2.8.17
Enter ".help" for instructions
sqlite>
To see the schema information you can issue the .schema command, which display information on all the tables and its indexes:
sqlite> .schema
CREATE TABLE albumTable(         iAlbumId               INTEGER PRIMARY KEY, cAlbumTitle        VARCHAR(100) );
CREATE TABLE artistTable(        iArtistId              INTEGER PRIMARY KEY, cArtistName        VARCHAR(100) );
CREATE TABLE dirTable(           iDirId                 INTEGER PRIMARY KEY, cDirName           VARCHAR(260),iParentDirId       INTEGER );
CREATE TABLE genreTable(         iGenreId               INTEGER PRIMARY KEY, cGenreName         VARCHAR(50) );
CREATE TABLE playlistTable( iPlaylistId INTEGER PRIMARY KEY,cPlaylistName       VARCHAR(100), cFileName         VARCHAR(260),iDirId                     INTEGER );
CREATE TABLE playsongTable( iPlaysongId INTEGER PRIMARY KEY,iPlaylistId INTEGER, iOrderNr       INTEGER,iSongId         INTEGER );
CREATE TABLE songTable (         iSongId                INTEGER PRIMARY KEY,cSongTitle  VARCHAR(100),iArtistId          INTEGER,iAlbumId                INTEGER,iTrackNr            INT8,iTrackLength       INT16,iNrPlayed         INT16,cFileName         VARCHAR(260),iDirId                     INTEGER,iYear      INT8,iGenreId            INTEGER,iBitRate       INTEGER,iSampleRate    INTEGER,iFileSize      INTEGER,iMediaType     INTEGER );
CREATE INDEX album_cAlbumTitle ON albumTable (cAlbumTitle);
CREATE INDEX artist_cArtistName ON artistTable (cArtistName);
CREATE INDEX dir_cDirName ON dirTable (cDirName);
CREATE INDEX dir_iParentDirId ON dirTable (iParentDirId);
CREATE INDEX genre_cGenreName ON genreTable (cGenreName);
CREATE INDEX playlist_cPlaylistName ON playlistTable (cPlaylistName);
CREATE INDEX playsong_iOrderNr ON playsongTable (iOrderNr);
CREATE INDEX playsong_iPlaylistId ON playsongTable (iPlaylistId);
CREATE INDEX playsong_iSongId ON playsongTable (iSongId);
CREATE INDEX song_cFileName ON songTable (cFileName);
CREATE INDEX song_cSongTitle ON songTable (cSongTitle);
CREATE INDEX song_iAlbumId ON songTable (iAlbumId);
CREATE INDEX song_iArtistId ON songTable (iArtistId);
CREATE INDEX song_iDirId ON songTable (iDirId);
CREATE INDEX song_iGenre ON songTable (iGenreId);
CREATE INDEX song_iTrackNr ON songTable (iTrackNr);
To see some of the song information you can query the songTable:
sqlite> select * from songTable limit 3;
1|CRE041 Sprachen|1|1|0|4476|0|chaosradio_express_041.mp3|28|2007|1|128|44100|71709702|1
2|Java Posse #331 - Roundup '10 - Modules|2|2|331|3783|0|JavaPosse331.mp3|28|2010|2|96|44100|45460832|1
3|CRE080 Geschichte der Typographie|1|1|0|7947|0|chaosradio_express_080.mp3|28|2008|3|128|44100|127247455|1
You can use standard sql to update the information:
sqlite> update songTable set cSongTitle = "Sprachen - Chaos Radio Express 41" where iSongId = 1;
At this point I was about to hit the publish button for the post. Luckily I tried if the update happened at all. Turned on my device: Still the old title. Rebootet the device, deleted and recreated all indexes, inspected the Golb sourcecode, found nothing. After a while it struck me: I don't need golb for my GoGear version. This device seems to extract all information from the id3 tags directly, very likely during startup. Classic fail!
Abonnieren
Posts (Atom)


